This is a sample of a solar system inspection. When a technician performs a full inspection there are many things they are looking for, this page is an example. A technician looking for a specific fault may do things differently, but when I look at a system I look at the whole system. When you read through this sample inspection you will see why you cannot focus on a single component in the system.
No matter how you look at a solar system get into the habit of doing it the same way, each and every time, and then you will not miss anything. All of the readings I have taken in this inspection are using the readily available monitoring devices of the system. Now, if the system does not have monitoring built in, you may have to pull out a meter and do some math. I will add a section at the end of this document on how to accomplish that.
Site Survey
Step 1: Know the area. I want to have a clear understanding of the layout of the property, what is around, and what can cause shading. Depending on what company, what location, and/or what the scope of the inspection I am doing I may or may not use a drone. In this case since this is on my own property, and I am not in controlled air space, I am going to stand on the ground for this inspection. As you look at the panoramic view please note the following: Array 1 is the arrays on the main house. Array 2 is the front shed off to the left, and Array 3 is the ground mounted system off to the left, behind Array 2.
It is important to note direction. The driveway side of the house faces South. All the solar arrays are on the South facing side of the roofs. There is some shading that occurs on the right side of Array 1 (String 1) in the early AM from the trees. And the afternoon shading starts affection Array 2 due to the trees on the neighbors property around 4:00pm. This is important information and things to notice when you look at production later in this survey.
Having taken a wide area view I am going to add a few pictures coming in closer, to start getting a panel by panel view. If your pictures are high enough quality you can zoom in and see some pretty good detail of each panel, and get panel counts. In this case I can see number of panels:
Array 1: 20 panels (split into 4 strings because of variations of roof levels)
Array 2: 11 panels (one appears to be missing)
Array 3: 10 panels


Inverters, AC, and DC Disconnects
The next think I am going to do is find the inverters and get the inverter information. There are two inverters in this system. Inverter 1 serves Array 1 and is mounted on the side of the house next to the power meter. It is also controlled from a double pole 50 amp breaker in the main breaker panel. There is an outside disconnect for the DC side of Array 1 on the side of the inverter.


From the data plate information I can see that it is a Sunny Boy 3.8 inverter, grid tied, and the maximum output is 3.8KW/hr (3800 Watts per hour).
The second inverter is mounted in the shed that Array 2 is on. It is wired into the electrical system through the same circuit feeding the well. It is also protected by a breaker in the Generac transfer switch, a 20amp breaker is on this circuit. A quick check of wire size shows that the 20amp breaker is the maximum allowed for the wire going to that location of the property. No further additions can be made onto that array (feed). There is an outside disconnect for each of the DC side of Array 2 and 3 right next to the arrays.


The data plate shows that this inverter is a grid tied Sunny Boy 5.0 inverter. The maximum output for this inverter is 5.0 KW/hr (or 5,000 Watts/hr).
There are no batteries as a part of this solar system. 100% grid tied.
Detailed Solar Panel Inspection
The next thing I am going to check is the condition of all the panels on the roof. This is something that should be done on a yearly basis, and should be done by a qualified technician who knows what to look for. I always break it down into sections and do it in an orderly fashion. Depending on surroundings I may either start my inspection for the left or the right, but there is always a method to it that can be followed. Remember, pictures have GPS location, elevations, and time stamps. You can ALWAYS put them back into the order they are taken in.
Starting with Array 1 I am going to start further away and work in to get a good layout. The camera is high resolution so on any of these pictures the recipient of the report can scroll in. We are not going to an individual panel level yet. The following series of photos also allow the recipient to see any exposed wiring and connections. Many times they are not visible but if it is visible it can be affected by weather and general wear and tear. I always try to capture other areas of the roof as well to get a good layout of the roof.


The next series of photos focuses on Array 1, String 1. In this case this is the section of panels on the high portion of the roof closest to the trees. I am looking for any visible defects in the panels. You can click on the pictures and zoom in. I am also looking for any missing mounting hardware that would allow wind to affect the stability of the panels. We also want to make sure the panels are not touching any areas of the roof.


I will then move onto the next string (Array 1 String 2) and take a similar set of pictures. As I am taking the pictures I will zoom in further on any areas of concern. Using a drone I can get within 4 ft of the panels with the camera (you will see that in one of the arrays further down), and you can click on any of the pictures to zoom in.


Again, the key is to look for any obvious defects and be able to zoom in. In the above pictures there may be an issue, can you spot it? If not, don’t worry I will show you in my conclusions. I then move onto the next string, Array 1, String 3:


And, we look for the same things. Obvious defects, wiring issues, and mounting hardware missing. In Array 1, String 3 there is a small problem, can you spot it? Once I have Array 1, String 3 complete I will move onto Array 1, String 4 and capture a couple good pictures of that string.


Now, we move directly onto Array 2. The goal here is to do all of the panel inspections at one time.


While taking the pictures of Array 2, I have spotted a problem with some of the panels. I have taken the drone in closer to get better pictures of the panels in question. Can you see the issues?


And, finally I move onto Array 3. Once Array 3 is complete this concludes the solar panel side of the inspection.


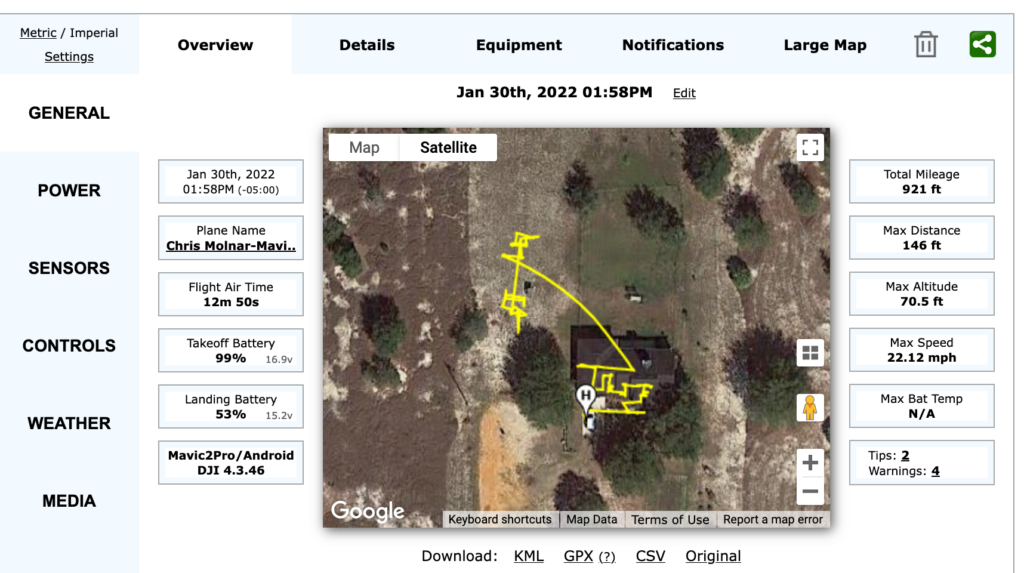
I have shared the flight logs for this inspection, I was interrupted while doing the Array 2 inspection so there are two logs.
First: https://app.airdata.com/share/deeWvu
Second: https://app.airdata.com/share/wqPEkH
Total flight time was about 15 minutes to inspect the entire system.
Monitoring Inspection
Next, I am going to enter the monitoring device that is present on all solar systems, and I am going to check for faults in the systems, anything out of the ordinary, and log entries. In the case of Sunny Boy systems, I am going to use Sunny Portal that the systems connect to and report into for diagnostic information.


I am then going to look at current and past production data to make sure that there is nothing out of the ordinary.


I am then going to go into the internal settings for inverter 1 and look at the status, the DC current values, and the AC current values. Again, need to make sure all strings are working, and all the values are within range.


Next I am going to look at the Inverter 2 internals. The same values Overview, DC, and AC current readings. I am looking for anomalies.


Now, if I find any anomalies, or any non-working strings, I will need to take a meter and dig a little deeper. In the case of this system all the readings are normal, but if I were to find any, I would take a meter and check the AC side, the DC side, and the per string values.
Conclusion from System 1:
On Array 1 I found several areas where there are missing supports and tie downs. The spacers (which are also tie-downs) are missing between the panels and some panels have moved. There is also one panel with two bad cells in them. The outside glass is not cracked but the cells inside have failed in a few places.


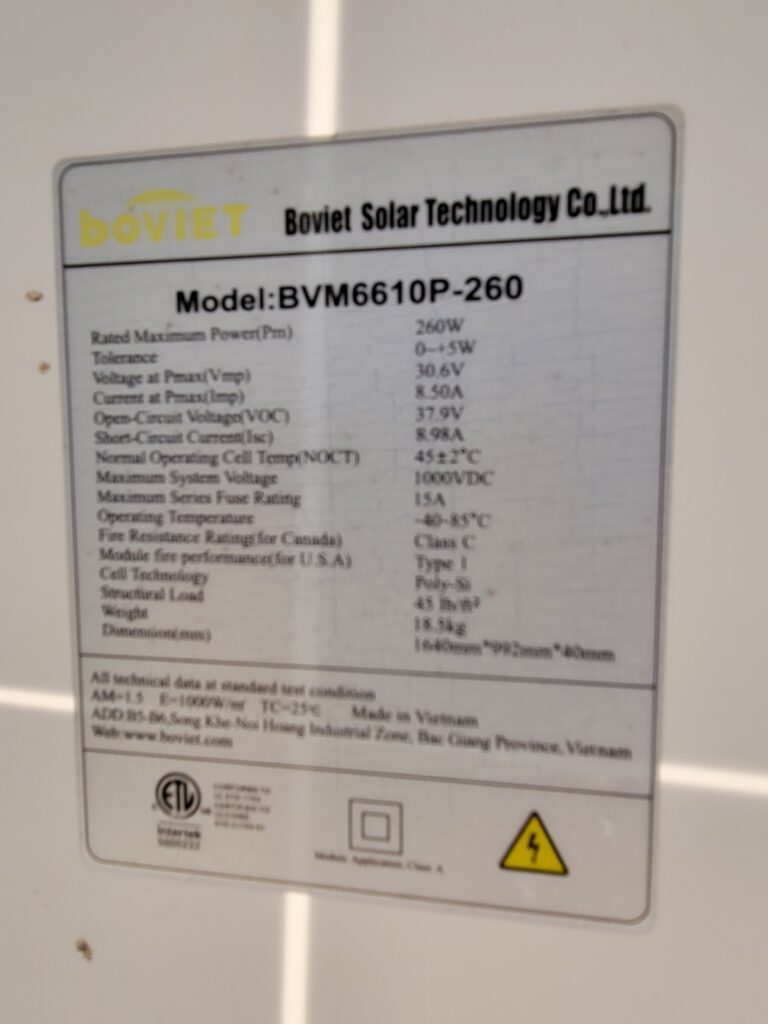
On Array 2 there are several cracked cells within the panels. You can clearly see these from drone pictures. These cells are degrading the overall performance of the system as these are not producing any power. There is also one missing panel that has been bypassed in the wiring. It blew off in a straight line wind event about a year ago. These are 260 Watt panels and all of these panels will need to be replaced.


Array 3 has no defects, but being a ground mount system, it is the easiest spot for us to get a data plate picture that allows us to properly size and price missing/damaged panels.
And that is a complete solar panel inspection. Again, this is something that should be done yearly to make sure the solar system is performing at it’s peak. When you find bad panels, structural issues, and any other defect the customer will have to make a decision based on risk, cost, and reward what repairs to make immediately and what repairs to delay.
Checks in Case of Electrical Issues
If I find production related issues or faults I will check further on the electrical side by opening up the inverter and directly accessing the connections and terminal blocks. Inverters have upwards of 450 Volts DC and this is not to be done by anyone not trained to do so. Most of the time we can rely on the readings from the monitoring, but not always.
There are two spots we check. First the DC side which is the solar panel side.


Then we check the AC side, the output to the breaker panel.


Again, all of the internal readings can be hazardous to your health and need to be done by a trained professional. In one of the pictures I am handling the leads without gloves, this is on a disconnected system. You must use full safety gear in these panels when energized.
Before leaving any solar inspection always check to make sure rapid shutdown works properly. It can save your life and the live of a first responder. If you disconnect power the system should shut down immediately for a grid tied system. If there are batteries present the system has some additional requirements for shut down, including a rapid shutdown switch or push button. Immediate and full shutdown is required.
As always, please leave a comment or send me an email if you have any questions.